


ShowTime
Body Work
| ↓ Click the Image to View Page ↓ | ||
|
|
Started working on the Dash, Steering Column, Tailgate and Hood in preparation for the primer. The hood has had some significant damage in the past, and the previous repair resulted in the front underside hood cross member being removed. However they did not install it back in the correct location. 2013-06-17 | |
|
|
I went ahead and removed the hood underside front reinforcement. I was easy as it was only held in with sheet metal screws. Once removed I straightened it and then reinstalled it I was able to get it closer to the original location, but not completely. It should fit better now. I used new SS shetmetal screws to hold it in place, and then welded it back in. Will need to use some body adhesive to make the reward attachments secure. I ten welded the broken areas of the grill and trimmed the bases on the roll bar and drilled the missing mounting holes. I wet up to spray primer outside, but got caught in a sudden rain shower, so i had to finish the priming inside the shop. 2013-06-18 | |
|
|
Started the long slow dirty job of filling, waiting to harden, sanding, repeat. 2013-06-19 | |
|
|
Well, the Grill Shell is ready for Sealer and Paint, that's more than I can say for the Hood. I hope that after tomorrow the hood is also ready. Looks like a little glaze filling, sanding, then some more fill primer and more sanding and I hope that's it for the hood. 2013-06-20 | |
|
|
Well, after 6+ hours of more work on the Hood, it's close, and I hope good enough for sealer and paint. After filling, sanding, filling, sanding, spraying fill primer, and a lot of sanding it's not bad. However if I was a real Body Man, you would not see all that blue/green and gray spots. 2013-06-21 | |
|
|
Well, the Hood is hopefully ready for sealer, and the hello the paint! I also got the front fenders ready for painting as well. 2013-06-24 | |
|
|
Well, after spending some time on the tailgate and dash, I decided to pull out the windshield frame. It's a little rough, but I got the glass out in one piece un-damaged. The Dash and tail gate are now in the final stages of filling and sanding. 2013-06-26 | |
|
|
Well, today I started back on the repairs to the Tub. Welded up a lot of screw holes, as well as repaired several rusted thru spots. Haven't started the drivers side floor yet, but did get the two main patch panels almost fabricated for the under floor storage area. 2013-06-27 | |
|
|
A little more work on the floor patch panels, then a lot of grinding on the tub hole welds. I also finished prepping the front fenders and dash for painting. 2013-06-28 | |
|
|
Spent 5 hours masking, seal coating, a little sealer run repair, and then spraying 1/2 gallon of paint, 6 coats. 2013-06-29 | |
|
|
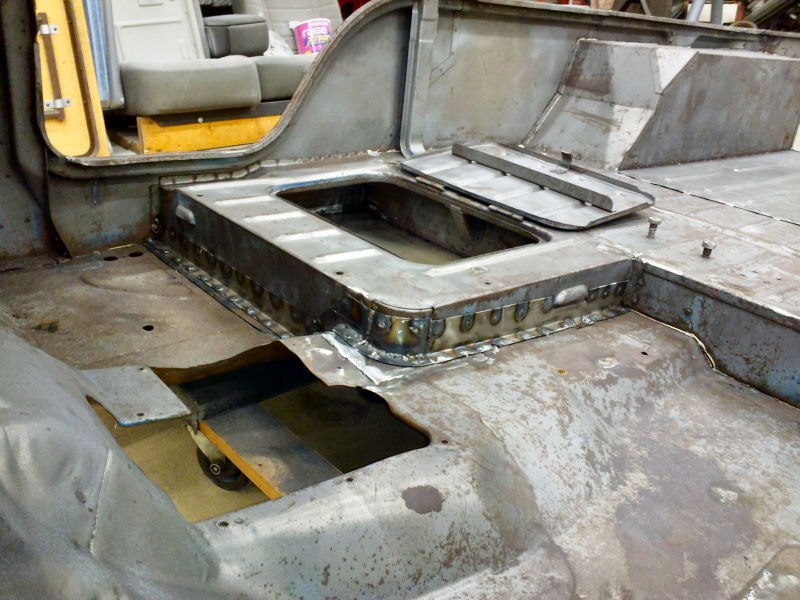
Just about patched up the bottom of the front floor. A little more welding and some grinding, then to flip it over and work on the top side and under seat storage area. 2013-07-08 | |
|
|
Well, with the exceptions of a few more small spots to repair, the tub is all but done on the repairs. With out having a break and a sheer, the repairs aren't the best class act, but will hold up well, and mostly disappear behind the floor coating. Next I'll have to clean it and prep it for the Epoxy Primer. Then comes the work of fabricating the seat mounts. 2013-07-09 | |
|
|
In addition to a few more spots fixed on the tub, I blasted a bunch of misc. parts, cleaned and epoxy primed them. 2013-07-10 | |
|
|
After one more tub repair, I set the tub back on the frame in preparation of fabricating the seat mounts. I installed a set of Ford Super Duty Seat Tracks I had laying around on the drivers seat. Next I started mocking up the seat location with out the steering wheel installed, and based on floor fell, thought I had a decent start. Next as a start to the drivers front seat mount frame, I pulled out my tubing bender, and a piece of 1" x 120 wall DOM tube. After deciding to install the steering wheel, I found I had the seat too far forward and high. So I'll likely not use the tub bent, but still use the tube. Once I confirm the location is good for the owner, I'll finish fabricating the mounts. 2013-07-11 | |
|
|
I finished up the Driver Seat Riser/Mount. the track had 7" of travel, and in the "normal" use location, there is 2" further rearward and 5" further forward it will adjust with in (~0.4" increments). Also set the Roll bar in place, and corrected it's forward location mounting holes. Also checked the rearward position holes. with out the half cab, the roll bar will be in the forward location, when you want to install the half cab you will either have to move the Roll bar to the rear location, or remove it. 2013-07-12 | |
|
|
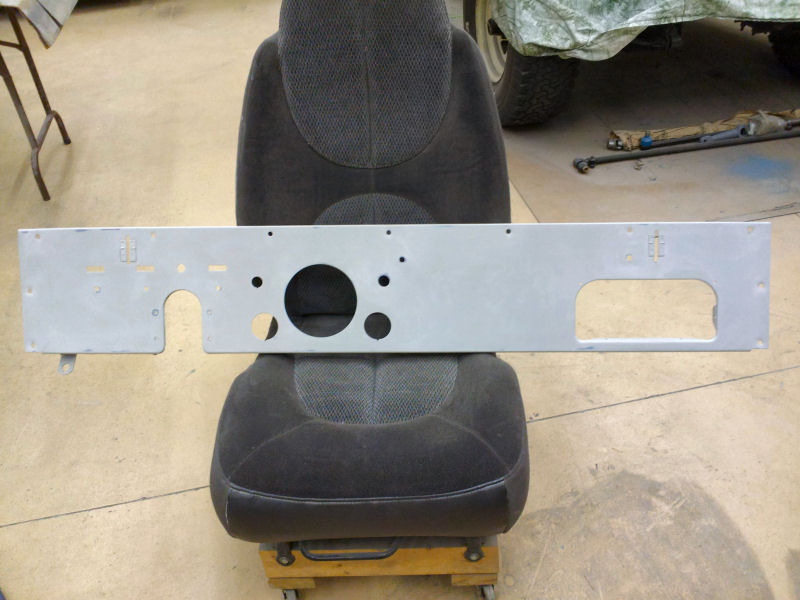
Here are some pictures of the correct passenger side seat mount. I've designed and elected to do it a bit differently, as the seat was allowed to tilt forward with out a latch from the factory. 2013-07-13 | |
|
|
Finished the design, and started fabricating the passenger side seat mounts. Here you can see the tub side brackets, all four identical. 2013-07-14 | |
|
|
Finished fabricating the Passenger Side Seat Mounts. The seat can tilt forward, or backward, all it takes is to pull the two pins you want and tilt. the seat can even be removed by pulling all four pins, or if needed be installed facing rearward. 2013-07-15 | |
|
|
Well, I pulled the Tub from the Chassis and proceeded to weld up a few new found holes, as well as some un-used holes. I also welded in a couple of reinforcement plates and the drivers inboard seat belt anchor. I then cleaned, and applied the Rust Converter in preparation for applying the Rust Converter before applying the Epoxy Primer. The converter needs to cure for 48 hours, so i won't be able to apply the converter until Thursday, so tomorrow I'll start cleaning and sanding the exterior panels of the tub. 2013-07-16 | |
|
|
Sanded and prepped the exterior metal of the tub for the Epoxy Primer, and started the repairs on the Steering Wheel. 2013-07-17 | |
|
|
After waiting the 48 hours for the Rust Converter to propery dry, I've now covered it all in Rust Converter. Now for it to dry overnight so i can spray the Epoxy Primer, and start sealing the seams and applying body filler and start the sanding, and sanding and sanding. 2013-07-18 | |
|
|
Sprayed the Tub, Bottom, Inside and Exterior all in the Epoxy Primer. Now to start the filling and sanding, repeat process, as well as the seam sealer. I also cleaned up the epoxy job on the steering wheel repair, now to do a little light filling and sanding on it before it's painted. 2013-07-19 | |
|
|
Started the process of Filling Sanding, Repeat man many times. 2013-07-20 | |
|
|
Spent some more quality time filling sanding and repeating. After several iterations, I'd gotten down to the metal in several areas, so I re-Epoxy Primed it, only to find I still had several spots that needed more filler, so I filled, sanded and repeated a few more times. the body isn't flat, but is smooth and relatively clean. the Rear corner looked straighter in person than it does in the 4th picture. So now to start the other side. 2012-07-21 | |
|
|
Worked on and completed the filling, sanding, repet on the Left side, top of Cowl and the inside of the tub. Again with the amount of metal I had showing I re-primed the areas with the Epoxy Primer. I'm getting a little better with the fill, sand and repeat process, especially when the body panels are small. Now to seal the interior and bottom side panel seams, and then spray the undercoating. 2013-07-22 | |
|
|
Applied the seam sealer to the inside and underside of the tub today, I then sprayed the U-POL Gravitex Plus HS Stone Chip Protector to the underside. At this point I've now got 261 hours of work into the CJ6. Next is Final Paint and Re-Assembly. 2013-07-23 |